Viv CLI Setup Instructions
This page is intended to help you get Viv installed and set up with the necessary prerequisites. It does NOT cover the debug process itself; for that, go back to the main instructions:
1. Installation
The goal of this section is to get the Viv binary running on your system.
Web installation (fastest)
-
Install CLI by running:
curl -fsSL install.silogy.io | bashThis will:
- Install Node.js ≥ 22, if it doesn't exist. Node.js is a JavaScript runtime that Viv is built on.
- Install the CLI tool from https://www.npmjs.com/package/@silogy/viv
If you don't want to run this script, you can also run these steps manually.
-
Run
viv versionto verify installation. Ensure that the Viv version is as expected (current most recent version: 0.0.24).
Install from viv.tar.gz
This is applicable if you received a viv.tar.gz installation package. This tarball contains a minified version of Viv's JavaScript source code. To install:
-
Run
node versionto ensure that Node is installed. The version must be greater thanv16.20.2. If it's not available or an older version, install an up-to-date version or let us know if this isn't possible. -
Extract the tarball in a convenient location.
-
Once you've done this, optionally make sure the extraction worked by
cd-ing into the viv directory and runningtree . -I node_modules(-I node_modulesprevents the hugenode_modulesdirectory from being printed). You should see something like this:viv
├── bin
│ └── viv
├── cli
│ ├── package.json
│ ├── rascal-binaries
│ │ └── aarch64-apple-darwin
│ │ └── rascal
│ └── scripts
│ └── install-rascal.cjs
├── package.json
├── rascal-binaries
│ └── aarch64-apple-darwin
│ └── rascal
├── src
│ └── shared
│ └── package.json
└── yarn.lock
-
-
Inside the newly created
vivdirectory, run:bin/viv --versionand ensure that the Viv version is as expected (current most recent version: 0.0.24).
Docker/Podman
This is applicable if you received a viv-container-image.tar.gz file. This file contains a gzipped container image. To load the image, simply unzip and load it by running:
gzip -d viv-container-image.tar.gz
docker image load -i viv-container-image.tar  # or 'podman ...'
The resulting image will be tagged silogy-viv:0.0.24 (or whatever version).
2. Setup
Make sure you have installed Viv before starting this section.
The goal of this section is to set up Viv with all external dependencies, such as an LLM provider API key and a license.
Quickstart (recommended in most cases)
The easiest way to get Viv set up is to run the Viv executable from a clean install with no parameters. This will take you step by step through the process for setting up the fixed seat license as well as the API key. We also provide more detailed instructions for each model provider. It's probably simplest to demonstrate with a video:
As you can see in the video, the quickstart process sets up a license key and a model provider API key.
Manual setup
If you are using vLLM or an OpenAI-compatible API that isn't hosted by Google, OpenAI, or Claude directly, then you must set Viv up manually.
All Viv configuration files are in the .viv subdirectory of the current Linux user's home directory. For example, the fedora user's Viv config files on a Linux system will be under /home/fedora/.viv. This architecture allows a single Viv binary to be shared among multiple users, with each user's preferences being respected.
The following three files must be set up (example at the bottom of this section):
config.json: This JSON file controls most of the configuration. It consists of a single JSON object with the following keys:llm: An object with the following key-value pairs:provider: The model provider type. Should be one of the following values:openai: OpenAIclaude: Claudegemini: Geminillama: An OpenAI-compatible provider. Note: If you are usingllama, you must supply bothmodelsand thebase_urlbelow.vllm: A vLLM-compatible model provider. This protocol is similar to but slightly different fromllama. Note: If you are usingvllm, you must supply bothmodelsand thebase_urlbelow.
base_url: (only ifproviderisllamaorvllm) The base URL for the OpenAI-compatible or vLLM-compatible provider. This is how you choose where your LLM calls should be routed. The value ofbase_urlmust include everything before thechatorresponsessegment of the URL, excluding the trailing slash. For example, if the chat completions URL is located athttps://example.com/v1/chat/completions, puthttps://example.com/v1here.models: (optional, except forllamaandvllm) An object with the following key-value pairs. If you are using eitherllamaorvllmprovider types, setting this correctly is crucial. Detailed instructions are located in the model choice section below.agent: (optional, except forllamaandvllm) The model that drives the main debugging agent, as well as subagents that perform specific tasks during debugging.chat: (optional, except forllamaandvllm) The model that drives the chat function and answers user questions.
mcp_servers: This key is managed by theviv mcpcommand. You can skip this key or leave it as the empty array[]. Once this has been populated by adding MCP servers, it should not be edited manually.
- API key file: A file containing the API key for your language model server. The file name must be one of
openai-key.txt,claude-key.txt,gemini-key.txt,llama-key.txt, orvllm-key.txtdepending on the provider. The file must contain just the API key, with no quotation marks or other formatting, for example,sk-proj-.... - License key file: Depending on your setup, Viv will either use a per-machine license or a floating license. If you're not sure which you're using, it's probably a per-machine license. In this case, the file name must be
license. The file must contain just the license, with no quotation marks or other formatting. If you're using a floating license, please reach out to your Silogy point of contact for one-on-one help.
A typical config.json looks like this:
{
  "mcp_servers": [],
  "llm": {
    "provider": "vllm",
    "base_url": "https://my-internal-model-server/api/v1",
    "models": {
      "agent": "meta-llama/llama-4-maverick",
      "chat": "meta-llama/llama-4-maverick"
    }
  }
}
Special note for Docker/Podman setups
If you are running Viv inside our container image, you will need to provide Viv with the configuration files listed above inside the /home/viv-user/.viv directory. We recommend running the container from the image with a no-op command and copying all necessary files into it, and running it using exec. For example:
# Create local configuration directory on the host machine:
mkdir my-viv-config

# Make changes to config.json:
vim my-viv-config/config.json

# Set up Viv license
cat 'eyJ...' > my-viv-config/license

# Set up provider key, for example if you're using OpenAI:
cat 'sk-proj-...' > my-viv-config/openai-key.txt

# Start the container
CONTAINER_ID=$(podman run -d silogy-viv:0.0.24 bash -c 'while true; do sleep 1; done')

# Copy configuration
podman cp ./my-viv-config $CONTAINER_ID:/home/viv-user/.viv

# Test that Viv runs correctly
podman exec -it $CONTAINER_ID viv version
Model choice
You can customize the model used for the debugging agent and for chat. This is optional, except for the llama and vllm provider types, where it is required because we don't know what models your model server provides. We provide information on available models below.
All information is current as of Viv version 0.0.24.
| Provider | List of available models | Default agent model if not specified | Default chat model if not specified |
|---|---|---|---|
openai | All snapshots and aliases listed at https://platform.openai.com/docs/models which support the Responses API. For example: gpt-5.2 or gpt-5.2-2025-12-11. | gpt-5.2 | gpt-5.2 |
claude | All model API IDs and aliases listed at https://platform.claude.com/docs/en/about-claude/models/overview. For example: claude-opus-4-5-20251101 or claude-sonnet-4-5. | claude-sonnet-4-5-20250929 | claude-sonnet-4-5-20250929 |
gemini | All non-image model codes listed at https://ai.google.dev/gemini-api/docs/models. For example: gemini-2.5-flash-lite, gemini-3-pro-preview. | gemini-3-pro-preview | gemini-3-pro-preview |
llama | Depends on which provider you've chosen, which you can do via base_url. The model name is provided as the model key in the JSON payload sent to the chat completion API. For example, if you're using Llama 3.3 70B on OpenRouter, then use meta-llama/llama-3.3-70b-instruct. | N/A | N/A |
vllm | Depends on which provider you've chosen, which you can do via base_url. The model name is provided as the model key in the JSON payload sent to the chat completion API. For example, if you've started the server with vllm serve NousResearch/Meta-Llama-3-8B-Instruct, then use NousResearch/Meta-Llama-3-8B-Instruct. | N/A | N/A |
Appendix: How to create an API key
Just to make things easier, here's how you create an API key:
Create an OpenAI API key
If you are using OpenAI:
-
Go to https://auth.openai.com/log-in and sign up.
-
In the upper right of the screen, click on the gear icon to go to Settings.
- If you see "Start building" in the upper right, click on it and fill in your information to create an organization on the OpenAI platform, pressing "I'll do it later" for everything. If you're prompted to create an API key, skip it for now.
-
Ensure you have sufficient credit: in the left panel, under the Organization heading, click Billing. If you don't have at least a few dollars in your account, add some.
-
Also in the left panel under Organization, click on "API keys."
-
Click on "+ Create new secret key."
-
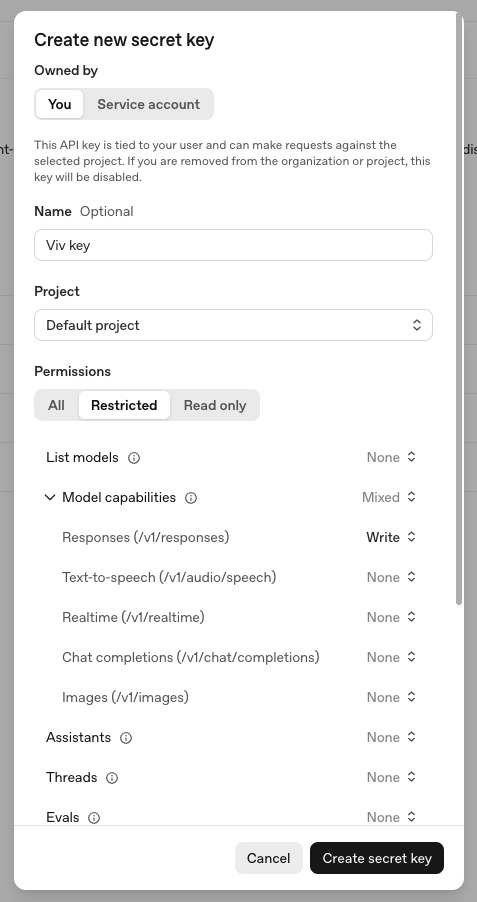
If you are setting up Viv to use interactively, then under "Owned by," select "You." If you intend for Viv to be called by automation such as CI, choose "Service account" instead.
-
Give the key a meaningful name and under "Project" select "Default project."
-
If you chose "Owned by: You" above, set the Permissions to Restricted. Under "Model capabilities," set "Responses (/v1/responses)" to "Write." You do not need to set any other permissions. It should look like this:
-
Press "Create secret key" to view the secret key. Save this key somewhere secure.
Create a Claude API key
If you are using Claude:
- Go to https://platform.claude.com/login and sign up.
- Expand the left hand side panel. Under Manage, click Settings.
- Go the Billing section, add your payment information, and purchase a few dollars' worth of credits.
- Go to the API keys section and click "+ Create key."
- Select the Default workspace and give your key a name.
- Press "Add" to view the secret key. Save this key somewhere secure.